NOTE: SD Notary has been superseded by SD Notary 2.
SD Notary is a utility for having apps notarized by Apple. With macOS 10.13.6, Gatekeeper is requiring notarized apps where it previously accepted simple code-signed apps.
The basic process involves three steps: a more comprehensive form of code-signing, submission to Apple where the app is checked and approved, and (optionally) stapling the resulting ticket to the app.
Most macOS applications are written in Xcode, and the process is designed with that in mind. For apps not written in Xcode, such as script applets, notarizing can be done using command line tools. Some of these tools, though, are still actually part of Xcode.
SD Notary is an app that wraps a more friendly user interface around these tools. Although it was designed with script applets in mind, it should work with any application that has relatively straight-forward requirements. (SD Notary was notarized by itself.) It will notarize .app, .dmg, .pkg, .plugin and .fmplugin files.
As of version 1.4.4 it is a universal application, running native on both Intel and Apple silicon Macs.
Requirements
* MacOS 10.13 or later.
* Xcode 10 (or later), available from the Mac App Store, must be present, and have been run at least once to install its command line tools.
* An Apple ID with two-factor authentication (not two-step verification).
* An application specific password. See . You must also add this password to your login keychain (see below).
* An Apple developer account in the name of the above Apple ID.
* Membership in the Apple Developer Program. This costs $US99. This entitles you to generate a Developer ID code-signing certificate, which you need to sign code. See https://developer.apple.com/programs/ .
* A working Internet connection. Notarizing involves communicating with Apple servers.
Download
SD Notary 1.4.12 (3MB)
Using SD Notary
Assuming you have met all the above requirements, you can run SD Notary. If you have multiple versions of Xcode running, you may need to use xcode-select to make sure the correct one is running.
Your Developer ID signing identity should appear in the popup at the top of the window. You should enter your Apple ID, and the name you used when you added your app-specific password to your login keychain (see below).
If your Apple ID is associated with more than one Apple Development Team, you will also need to enter the Provider short name of the team you wish to use. There is a Choose… button, which retrieves team membership information from Apple and let you choose the right team, but it is active only is you are running Xcode 11 or later.
A good initial test is to click the Fetch History button, which will fetch details of any apps you have tried to notarize. If you get an error, it’s likely you have entered one of the above values incorrectly.
A checkbox, When submitting, create and staple image, lets you choose to create a .dmg file as part of the process, and if you have the application DropDMG installed, you can choose to have the .dmg created by it, using the configuration you choose from the popup menu.
To the right is a tab view with tabs for Entitlements and Advanced. This is where you specify the entitlements your app needs. The default values suit a basic AppleScript applet: it is allowed to send Apple events, and to load third-party frameworks (required in some cases where AppleScriptObjC is used). You can adjust these values accordingly.
Another button let you skip signing enclosures, and should normally be unchecked.
Rather than have to enter all your settings each time, you can set up a document window with your preferred values, then choose Set Document Defaults from the File menu. This will store the window’s values, and they will be used each time you open a new window.
Once you have it set up your requirements, you can press the Submit… button, choose your app in the sheet that appears, and begin the process. If all goes well, you will end up with a notarized and stapled copy of your app.
You can, instead, drag your application over SD Notary’s icon. Set your entitlement requirements in the window that appears, and press the Submit Now button.
If your app has been successfully uploaded but the process is interrupted before the stapling process — there is a delay of several minutes or more involved — you can use the Staple Only… button to select the submitted copy and attempt to staple it.
Signs of progress
Depending on the size and complexity of your app, the speed of your Internet connection, and how busy Apple’s servers are, the whole process can take quite a while. There can be a delay of many minutes between uploading and stapling (or notification of failure). The Log area will keep you informed of what is happening. If there is an error, it will display any explanation provided.
The copy of the app you choose when you press Submit App will not, itself, be modified. Instead, SD Notary will create a folder next to it, named after the app, and make a copy there. So if you have chosen MyApp.app, a folder called MyApp – Working will be created next to it.
The Working folder will contain a copy of the app, a .zip of the file for uploading, a file called Entitlements.plist containing the entitlements being claimed, plus a text file called Submission Log.txt. This log file is more detailed than the log that appears in the SD Notary window, and includes each command-line call, and full results.
If the upload succeeds, the folder will be renamed MyApp – Submitted, the .zip file deleted, and a new file added, called RequestUUID.txt. This contains the UUID Apple has provided, in case you need to check later on.
At this stage SD Notary starts polling Apple’s servers to find out if the app has been approved. Assuming it has, the app is stapled with the notarizing ticket, the folder is renamed MyApp – Notarized, and the original version is moved into a subfolder called MyApp – Unmodified Original. It it has not been approved, the folder will be renamed MyApp – Failed, and the original left where it was.
Sometimes Apple’s servers respond to checks for status incorrectly. Typically this involves an error number 239, and the servers eventually correct themselves, although sometimes up to several hours later. If such an error occurs, as of version 1.4 SD Notary will keep re-checking about once a minute, rather than return an error. The maximum number of retries is 1000, but this can be changed via scripting, through the application’s known error retry limit property. The minimum number of attempts is 3. (When this happens, it is sometimes quicker to cancel and try again. There have been cases where a second upload is approved within minutes, while the original was not approved for many hours.)
Notarizing disk images and packages
SD Notary can also notarize .dmg, .pkg, .plugin, and .fmplugin files.
Notarizing .plugin and .fmplugin files is similar to notarizing an app. Notarizing .dmg and .pkg files involves a different workflow, because only read-only disk images and flat .pkg files can be notarized. In this case you need to sign the contents of the disk image or package before you create the image or package file itself. Then you create the .dmg or .pkg file from the signed content, and submit it for notarizing.
Signing of .pkg files requires a Developer ID Installer identity, rather than a Developer ID Application identity, so you must ensure you have both certificates installed if you wish to submit packages. If you have already signed the .pkg file while building it, it will not be re-signed.
You use the Sign Only… button to sign disk image and package contents. When you press the button, you can choose the app to sign, or you can choose a folder containing all the files that will end up in the disk image. The latter is useful if you are including more than one app. Once the signing is complete, you can make your disk image or package, and then submit it the same way as you would submit an app directly.
It is important that you do not make any changes between signing and creating a disk image or package, and that you use the notarized versions for distribution. When a disk image or package is notarized, any tickets for its contents are attached to the container file, and these will be lost if you repackage it. If in doubt, you can also notarize apps separately before adding them to a disk image file for notarization.
Creating disk images
SD Notary now has an option to create a disk image as part of the process, optionally using DropDMG.app if you have it installed. The notarization process works slightly differently when you choose either of these options.
if you do not choose to create a disk image, your app or plugin is signed, and then a .zip file of it is created and submitted to Apple. Once it is approved, the .zip file is discarded and the signed copy is stapled. The stapling step is optional, and is just a convenience. When someone tries to open a notarized application for the first time, the system look for the notarization ticket stapled to it. If it is not found, it contacts Apple’s servers to see if the app has been notarized anyway. Obviously, this can involve a significant delay, and can be inconvenient if you are off-line.
If you choose the disk image option, your app is signed as above, and then a read-only .dmg file is created and uploaded to Apple, instead of a .zip file. Once the app has been checked and approved, the .dmg file is stapled, rather than the signed copy of the app — the signed copy is in fact discarded. When you distribute such a disk image, the stapled ticket is read when the image is mounted, so the system does not need to check the app’s status when you first launch it.
By using a disk image, you can encourage people to copy your app to somewhere outside their downloads folder, which in turn can remove some quarantined behavior. If you use DropDMG, you can specify a configuration so that other elements, such as a licence, Read Me file and background graphic are included in the disk image file.
You can still create disk images the old way: Sign Only your app, build your disk image, and submit the disk image file. The new option just streamlines the process.
The detail
Notarized apps have to be code-signed in a more comprehensive way than traditional codesigning. The app has to be set to use what is called the Hardened Runtime. This means the application cannot do any of the things listed in the Entitlements or Advanced tab views unless they are checked there. The signature also has to include a time-stamp. Also, all executable code in the app bundle must be similarly signed individually using the same identity, and done so recursively from the deepest to the shallowest. SD Notary does this recursive code-signing, although there may be cases where you will want to notarize items before you add them to the bundle (see Hints below).
Any existing code-signing will be replaced, so when exporting a run-only version of an applet, there is no point in code-signing it at that stage.
Hints
Apple expects to find code in certain places in a bundle. For example, frameworks are generally in Contents/Frameworks, leaving Contents/Resources/ for resources. (In this discussion, script files are not considered code.) If Apple doesn’t like the way your code is structured, your app may be rejected.
A simple AppleScript applet (or Enhanced Applet from Script Debugger) should present no problems. But you need to be careful if you add other files.
For further guidance, see the section Structure Your Code Correctly here: https://forums.developer.apple.com/thread/128166.
If your app is a distribution app, and contains other applets within its bundle, you might wish to notarize the applets to be distributed individually before adding them to the main app, and then check the Don’t sign enclosures checkbox when signing the main app.
The other issue you need to be careful with is the bundle ID of your apps. Make sure they are unique for each app you upload, and preferably based on a domain name you own or control.
App-specific password
Notarizing uses a tool that requires password authorization. This means you need to do two things:
• Set up an app-specific password. You do this by signing into you Apple ID account page , and clicking Generate Password below App-Specific Passwords.
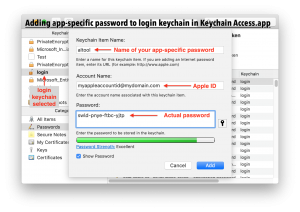
• Add the app-specific password to your login keychain. Open Keychain Access.app, select the login keychain on the left (it is very important that you choose the correct keychain), choose File -> New Password Item…, and enter the name of your app-specific password as the Keychain Item Name, enter your Apple ID for the Account Name, and enter the actual app-specific password in the Password field.
You should enter the name of the app-specific password in SD Notary.
When you submit or sign an app and it fails because of a problem with your file, you can choose Submit Again or Sign Again from the File menu once you have built a new version (of the same name and in the same place), rather than having to go through the process of choosing the file again.
Scripting
SD Notary is fully scriptable. When using the submit app command, you need to set a very large timeout. Some errors include extra logging information in their from parameter. Because commands can take a considerable amount of time, most application properties can only be changed while the status property returns the string “ready”, to avoid changing values mid-process.
Application-level properties generally affect the default values when a new document window is created in SD Notary. This is the same as changing a value and choosing Set Document Defaults in the File menu.
The paths to skip property is an advanced setting that is not exposed in the interface at this stage.
5 thoughts on “SD Notary: Notarizing Made Easy”
Comments are closed.